Posts

Showing posts with the label woodworking

DIY Butcher Block Table Legs: How to Build a Sturdy and Stylish Base

Image
When building a butcher block table , the tabletop is often the main focus. However, the legs or base of the table are just as important for both functionality and style. In this guide, we'll show you how to build sturdy and stylish legs for your DIY butcher block table. Materials Needed 4x4 or 2x4 lumber for the legs 2x4 lumber for the crossbars Wood screws Wood glue Wood stain or paint (optional) Step-by-Step Guide Step 1: Measure and Cut the Lumber Start by measuring and cutting the lumber for the legs. The length of the legs will depend on the height of the table you want to build. A standard height for a dining table is around 30 inches, so you'll need to cut your legs to that length or slightly longer if you want to add adjustable feet. Cut four pieces of the same length for the legs. Step 2: Cut the Crossbars Cut two pieces of 2x4 lumber to the same length as the distance between the legs on each end of the table. These will be used as crossbars to...

How to Make a Thick Butcher Block Table: A Comprehensive Guide

Image
A butcher block table is a timeless addition to any kitchen or dining room. With its warm and rustic appeal, it not only serves as a functional workspace but also as a beautiful piece of furniture. If you're looking to make a statement with your butcher block table, a thick tabletop can provide both visual impact and durability. In this article, we'll guide you through the process of making a thick butcher block table. Materials You'll Need Before getting started, make sure you have the following materials: Hardwood boards (maple, cherry, or oak are popular choices) Table saw Jointer Planer Wood glue Clamps Sandpaper (80 and 120 grit) Food-safe finish (mineral oil or beeswax are popular choices) Step-by-Step Guide Follow these steps to make your own thick butcher block table: Step 1: Choose Your Wood Choose hardwood boards that are at least 2 inches thick. You'll need at least 3-4 boards for a tabletop that is 2-3 inches thick. Maple, c...

Build Your Own Folding Picnic Table Bench for Outdoor Fun

Image
If you love spending time outdoors and hosting gatherings, then having a picnic table bench is a must-have. Picnic tables are great for enjoying meals, playing games, and having conversations with friends and family. However, they can take up a lot of space in your backyard or patio. This is where a folding picnic table bench comes in handy. Not only does it save space, but it's also easy to store when not in use. In this article, we will guide you on how to build your own folding picnic table bench. Tools and Materials Needed Before starting any DIY project, it's essential to have all the necessary tools and materials on hand. Here's what you will need: Table saw Compound miter saw Jigsaw Drill Hammer Measuring tape Screws Wood glue Sandpaper Stain or paint Wood boards (2x4s, 2x6s, and 1x6s) Hinges Step-by-Step Guide Now that you have all the necessary tools and materials let's start building your fol...

How to Make a Butcher Block Table: A Step-by-Step Guide

Image
If you're in need of a sturdy and durable table for your kitchen or dining room, a butcher block table is an excellent choice. Not only is it functional and practical, but it also adds a warm and rustic charm to any space. In this article, we'll guide you through the process of making your own butcher block table. Materials You'll Need Before you get started, make sure you have the following materials: Hardwood boards (maple, cherry, or oak are popular choices) Table saw Jointer Planer Wood glue Clamps Sandpaper (80 and 120 grit) Food-safe finish (mineral oil or beeswax are popular choices) Step-by-Step Guide Follow these steps to make your own butcher block table: Step 1: Choose Your Wood Choose hardwood boards that are at least 1 1/2 inches thick. Maple, cherry, and oak are popular choices because they're durable and hold up well over time. You can also mix and match different woods for a unique look. Step 2: Cut the Boards to Size ...

Guide to Making a Folding Table Plan Drawing

Image
Making a plan drawing for a folding table is an important step to ensure that your table is functional, stable, and aesthetically pleasing. It allows you to visualize the design, determine the dimensions and materials, and identify any potential problems or modifications. In this article, we'll provide a step-by-step guide to making a folding table plan drawing that meets your needs and expectations. Step 1: Define the Purpose and Requirements The first step in making a folding table plan drawing is to define the purpose and requirements of your table. Consider the following factors: What will be the primary use of the table? (e.g., dining, working, crafting, etc.) What size and shape do you need the tabletop to be? How many people do you want the table to seat? What materials do you want to use for the tabletop and frame? Do you want any additional features, such as storage, wheels, or adjustable height? By answering these questions, you can creat...

Why Butcher Block Building Plans are a Must-Have for DIY Enthusiasts

Image
Butcher block is a classic and timeless material that is used in a variety of ways. From kitchen countertops to cutting boards, butcher block is durable and has a natural beauty that can’t be replicated. If you’re a DIY enthusiast looking to add a touch of elegance to your home, building your own butcher block is a great project to take on. Not only will it save you money compared to buying pre-made butcher block, but it’s also a fun and rewarding experience. Benefits of Butcher Block Building Plans Building your own butcher block can seem like a daunting task, especially if you’ve never tackled a project like this before. That’s where butcher block building plans come in handy. These plans provide step-by-step instructions that make the process much easier to follow. Here are some additional benefits of using butcher block building plans: Accuracy: The plans ensure that all measurements are correct, so you don’t have to worry about making mistakes. Efficiency: Following a pla...

DIY 6' Picnic Table with Separate Benches Plans: Create a Classic and Functional Outdoor Space

Image
A picnic table with separate benches is a classic addition to any outdoor space. Not only is it functional, but it also adds a touch of nostalgia and charm. Plus, building your own 6' picnic table with separate benches can be a fun and rewarding DIY project that will provide years of use and enjoyment. Materials Needed Before you begin your project, gather the following materials: 8 pieces of 2x4 lumber, 6 feet long 4 pieces of 2x6 lumber, 6 feet long 2 pieces of 2x6 lumber, 8 feet long 2-1/2 inch deck screws Wood glue Waterproof wood sealer or stain Sandpaper Tools Needed In addition to the materials listed above, you'll need the following tools: Measuring tape Circular saw or hand saw Drill Screwdriver bit Speed square Sanding block or power sander Paintbrush Building the Picnic Table and Benches Follow these steps to build your own 6' picnic table with separate benches: Step 1: Cut the Lumber Using your measuring tape...

Why 2-Inch-Thick Lumber is Ideal for Building an Adirondack Chair

Image
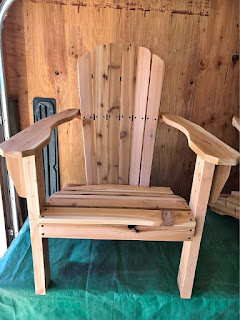
Adirondack chairs are a classic piece of outdoor furniture that are loved for their comfort and style. However, when it comes to building your own Adirondack chair, choosing the right lumber is crucial. One important consideration is the thickness of the lumber. While thinner lumber can be used, a 2-inch thickness is ideal for building a sturdy and long-lasting Adirondack chair. In this article, we'll explore why 2-inch-thick lumber is the best choice for building an Adirondack chair. Strength and Stability One of the main reasons why 2-inch-thick lumber is ideal for building an Adirondack chair is its strength and stability. A thicker piece of lumber is less likely to warp or crack over time, which is important for outdoor furniture that is exposed to the elements. Additionally, the thicker lumber provides more stability and support for the weight of the person sitting in the chair. Comfort Another benefit of using 2-inch-thick lumber for an Adirondack chair is comfort. The ...

DIY Build Adirondack Chair Folding: A Guide to Crafting Your Own Comfortable Seating

Image
If you love spending time outdoors, you know how important it is to have comfortable seating. One of the best options is an Adirondack chair, which offers both comfort and style. However, purchasing a brand new Adirondack chair can be quite expensive. Fortunately, you can save money and create a custom piece of outdoor furniture by building your own Adirondack chair . In this guide, we'll walk you through the process of building a folding Adirondack chair that will become a staple in your outdoor living space. What You'll Need: 2-inch-thick lumber (cedar or pine) Saw (circular or jigsaw) Sandpaper (100-grit and 220-grit) Drill Wood screws (2.5-inch and 1.5-inch) Wood glue Tape measure Compass Pencil Step 1: Cut the Pieces Using your saw, cut the lumber into the following pieces: 2 armrests: 30 inches long by 4 inches wide 1 backrest: 36 inches long by 4 inches wide 1 seat: 20 inches long by 20 inches wide 2 legs: 38 inches long by...

How to Build a Butcher Block Table with Storage

Image
A butcher block table with storage is a practical and stylish addition to any kitchen or dining room. Not only does it provide a sturdy surface for food preparation and dining, but it also offers convenient storage space for utensils, dishes, and other kitchen essentials. In this article, we'll guide you through the process of building your own butcher block table with storage. Materials You'll Need Before you get started, make sure you have the following materials: Hardwood boards (maple, cherry, or oak are popular choices) Table saw Jointer Planer Wood glue Clamps Sandpaper (80 and 120 grit) Food-safe finish (mineral oil or beeswax are popular choices) 1x4 boards for the storage frame Plywood for the storage box and shelf Drawer slides Drawer pulls Wood screws and pocket hole screws Step-by-Step Guide Follow these steps to make your own butcher block table with storage: Step 1: Choose Your Wood Choose hardwood boards that are at ...

Building Your Own Folding Picnic Table Bench: Using Printable Plans

Image
  Building a folding picnic table bench can be a fun and rewarding DIY project, but it can also be intimidating if you don't have a lot of woodworking experience. Thankfully, there are plenty of printable plans available online that can help you tackle this project with ease. In this article, we'll explore the benefits of using printable plans and provide some tips on how to choose the best plan for your needs. Benefits of Using Printable Plans Clear Instructions One of the main benefits of using printable plans is that they come with clear instructions that are easy to follow. This is especially helpful if you're new to woodworking and aren't familiar with the terminology or techniques used in the project. Printable plans provide step-by-step instructions that can guide you through the process and help you avoid mistakes. Accurate Measurements Another benefit of using printable plans is that they provide accurate measurements for all the pieces you'll need to ...

DIY Square Picnic Table with 4 Benches

Image
  Are you looking for a fun and functional addition to your backyard or patio? A square picnic table with four benches is an excellent option. Not only does it provide a place for your family and friends to gather and enjoy meals and snacks outside, but it also adds an attractive feature to your outdoor space. If you're handy with tools and enjoy DIY projects, building a square picnic table with four benches is a great weekend project. Here's how to do it. Step 1: Gather Your Materials and Tools Before you start building your square picnic table with four benches, you'll need to gather your materials and tools. Here's what you'll need: Four 2x8x8 pieces of lumber for the tabletop and seats Eight 2x4x8 pieces of lumber for the frame and legs One pound of 3-inch wood screws One pound of 2-inch wood screws A circular saw or a handsaw A power drill or a screwdriver A measuring tape A pencil Sandpaper A paint or stain of your choice St...

Building an 8-ft Picnic Table with Detached Benches

Image
Building an 8-ft picnic table with detached benches can be a fun and rewarding woodworking project that's perfect for outdoor gatherings with family and friends. In this guide, we'll provide step-by-step instructions on how to build your own 8-ft picnic table with detached benches. Materials Needed 12 2x4s (8 ft long) 2 2x6s (8 ft long) 1 2x6 (12 ft long) 3 2x8s (8 ft long) 2 1/2-inch deck screws 2-inch deck screws Wood glue Waterproofing sealant Tools Needed Tape measure Circular saw or handsaw Drill Hammer Chisel Square Sander or sandpaper Step-by-Step Instructions Step 1: Cut the Wood Cut the wood according to the following measurements: Tabletop and benchtop boards: 2x8s cut to 8 ft long Tabletop and benchtop supports: 2x4s cut to 7 ft 1/2 inch long Bench legs: 2x4s cut to 16 inches long Table legs: 2x6s cut to 28 3/4 inches long Table braces: 2x4s cut to 24 inches long Step 2: Assemble the Benches Using 2 1/2-inch deck screws, attach tw...

How to Build a Picnic Table: A Step-by-Step Guide

Image
There's nothing quite like enjoying a delicious meal outdoors with friends and family. A picnic table is a great addition to any backyard, park or campsite. It's a sturdy and functional piece of furniture that can comfortably seat a large group of people. If you're looking to build a picnic table for your next outdoor gathering, this step-by-step guide will show you how to do it. Materials Needed Before you get started, you'll need to gather the necessary materials. Here's a list of what you'll need: Pressure-treated lumber (2x4s, 2x6s, and 2x8s) Wood screws Wood glue Sandpaper Paint or stain (optional) Table saw Power drill Jigsaw Tape measure Step 1: Cut the Lumber Using a table saw, cut the lumber to the following lengths: 4 pieces of 2x4s cut to 30 inches in length for the legs 4 pieces of 2x6s cut to 72 inches in length for the top 2 pieces of 2x8s cut to 72 inches in length for the benches 4 pieces of 2x4s c...

Picnic Table Dimensions: What You Need to Know

Image
When building a picnic table , one of the most important factors to consider is the dimensions. The size of your picnic table will affect how many people can comfortably sit and eat, as well as how much space it will take up in your outdoor area. In this guide, we'll go over the standard picnic table dimensions and what you need to know before building your own. Tabletop Size The tabletop is the most important part of the picnic table, as it's where people will be eating and socializing. The standard tabletop width for a picnic table is around 28-30 inches (71-76 cm). The length can vary depending on how many people you want to accommodate. A typical length for a six-foot (1.8 m) picnic table is 72 inches (183 cm), while an eight-foot (2.4 m) table is 96 inches (244 cm). Seat Height and Width The height of the seats is also an important consideration. The standard seat height for a picnic table is around 18 inches (46 cm) from the ground. This allows for comfortable seating...

How to Build a Wood Picnic Table with Benches: A Step-by-Step Guide

Image
A wood picnic table with benches is a classic addition to any backyard or outdoor space. It's the perfect spot for enjoying meals, playing games, or just relaxing in the sunshine. Building your own picnic table may seem like a daunting task, but with this step-by-step guide, you can easily create a beautiful and functional piece of furniture. Materials Needed Before you get started, gather the following materials: Pressure-treated lumber (2x4s, 2x6s, and 2x8s) Wood screws Wood glue Sandpaper Paint or stain (optional) Table saw Power drill Jigsaw Tape measure Step 1: Cut the Lumber Using a table saw, cut the lumber to the following lengths: 4 pieces of 2x4s cut to 30 inches in length for the legs 4 pieces of 2x6s cut to 72 inches in length for the top 2 pieces of 2x8s cut to 72 inches in length for the benches 4 pieces of 2x4s cut to 68 inches in length for the bench supports 2 pieces of 2x4s cut to 60 inches in length for the cross...

Butcher Block Table DIY: A Step-by-Step Guide and Material List

Image
If you're looking for a project to spruce up your home, building your own butcher block table can be a rewarding and practical DIY project. Not only does it add a touch of rustic charm to your space, but it also provides a durable and sturdy surface for cooking and dining. In this article, we'll provide a step-by-step guide and material list for building your own butcher block table. Materials You'll Need Before you begin, gather the following materials: Hardwood boards (maple, cherry, or oak are popular choices) Wood glue Clamps Table saw Jointer Planer Sandpaper (80 and 120 grit) Food-safe finish (mineral oil or beeswax are popular choices) Safety goggles Dust mask Measuring tape Square Drill with screwdriver bit Screws (1 1/4 inch and 2 inch) Screw hole plugs Step-by-Step Guide Follow these steps to build your own butcher block table: Step 1: Cut the Legs Begin by cutting the legs of your table. The height of your ta...

Woodworking Picnic Table Project: Tips and Tricks

Image
Building a picnic table can be a fun and rewarding woodworking project, whether you're a beginner or an experienced woodworker. In this guide, we'll provide tips and tricks to help make your woodworking picnic table project a success. Choose the Right Wood Choosing the right wood is important for the longevity and appearance of your picnic table. Pressure-treated pine and cedar are popular choices for their durability and resistance to decay. Hardwoods like oak and teak can also be used, but they may require more maintenance and cost more. Use Accurate Measurements Accurate measurements are crucial to ensuring that your picnic table is sturdy and level. Use a measuring tape, square, and straightedge to mark and cut the wood pieces. Take your time and double-check your measurements before cutting. Pre-Drill Holes Pre-drilling holes for screws can prevent the wood from splitting and make the assembly process smoother. Use a drill with the appropriate size bit for your sc...

DIY Outdoor Picnic Table and Bench Set

Image
A picnic table and bench set is a must-have for any outdoor gathering, whether it's a family BBQ, a weekend camping trip, or just a casual get-together with friends. With this step-by-step guide, you can build your own DIY outdoor picnic table and bench set and have a sturdy and stylish piece of furniture that will last for years to come. Materials Needed Before you get started, gather the following materials: Pressure-treated lumber (2x4s, 2x6s, and 2x8s) Wood screws Wood glue Sandpaper Paint or stain (optional) Table saw Power drill Jigsaw Tape measure Step 1: Cut the Lumber Using a table saw, cut the lumber to the following lengths: 4 pieces of 2x4s cut to 30 inches in length for the legs of the picnic table 4 pieces of 2x6s cut to 72 inches in length for the top of the picnic table 2 pieces of 2x4s cut to 60 inches in length for the cross supports of the picnic table 4 pieces of 2x4s cut to 17 inches in length for the supports of ...

Materials Needed to Build a Picnic Table: A Comprehensive List

Image
Building your own picnic table is a great DIY project that can provide a fun and functional addition to your outdoor space. Before you begin, it's important to have all the necessary materials on hand. In this guide, we'll provide a comprehensive list of the materials you'll need to build a picnic table. Wood Wood is the primary material needed to build a picnic table. You'll need the following types of wood: Pressure-treated pine or cedar boards for the tabletop, benches, and legs 2x4 boards for bracing and supports 2x6 boards for the seat and table aprons Hardware Hardware is necessary for securing the wood pieces together. You'll need: Galvanized screws or nails Washers Bolts and nuts for attaching the legs L-brackets for attaching the benches to the frame Tools You'll need the following tools to build a picnic table: Saw (circular or miter saw) Drill with various bits Screwdriver (manual or electric) Socket wrench ...